
In the previous post on Earendel, I talked about how I was putting the barest building blocks of the engine together. I'd like to expand on that a little more, now that I can draw multiple things to screen. Behold! I can now draw spheres and triangles to the screen at once! Unity should be quaking in their boots!
Okay, I jest of course; the video above is very basic and quite boring but underneath, there is something more crucial going on.
When it comes to computer graphics generally, whether it be DirectX, WebGL, OpenGL, Vulkan - whatever - it tends to boil down to shaders and geometry. You need to fire some geometry at your GPU then run a number of small, filter like, programs at various stages in the pipeline; often just two places. This is where we are going to be spending most of our time. Sure, we will eventually need multipass rendering and the like but we should start somewhere and reign in the complexity a bit. Get the basics up first.
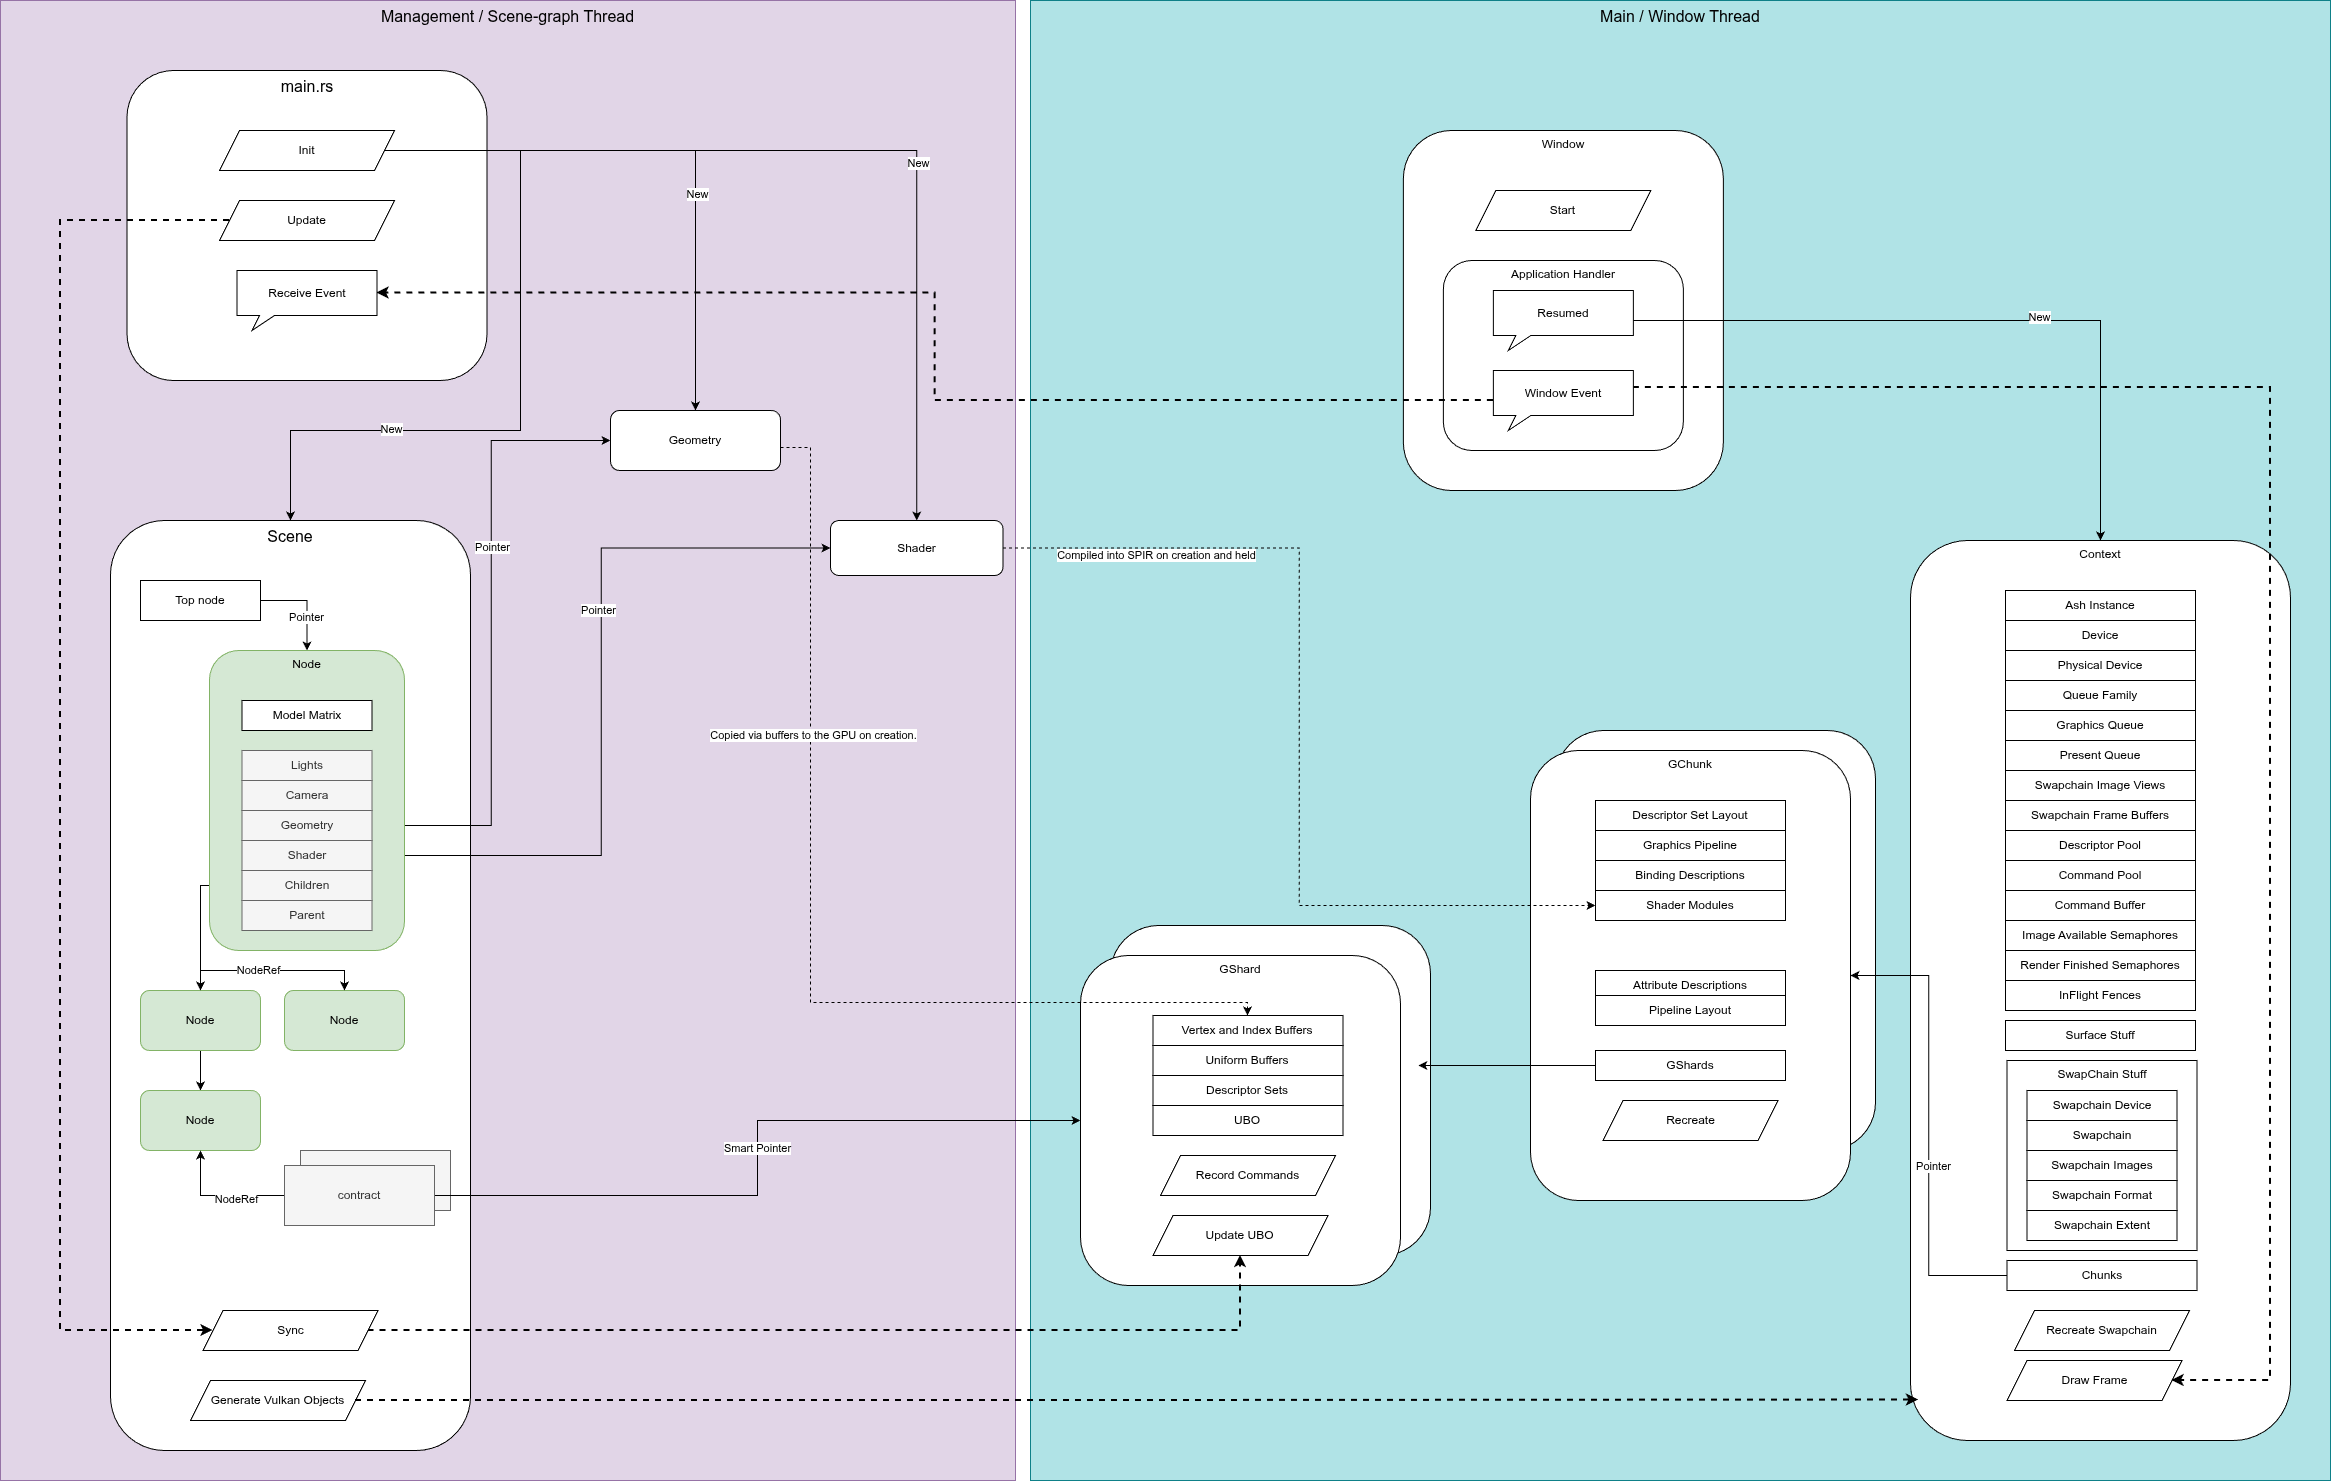
So with that in mind, what is the superset of things do we want to do? Have a screen with multiple different geometries with individual orientations and positions, different shaders, all sharing the same depth buffer (or not, we can choose but likely the same). In Vulkan terms, this means we need to have multiple Vulkan graphics pipelines in our scene - each with its own shader and geometry. In the last blog post, we built these and called them GChunks. However, we don't want to be creating too many of these if we don't need to; they are quite heavyweight and could therefore be inefficient under certain circumstances.
Quite often, we might draw a lot of different objects with the same shader, and probably the same geometry representation but with different positions. Maybe we change the colour or texture binding as well but that's it. We can do this a little more efficiently in Vulkan if we introduce another data-structure - something I've called a GShard.
So the GShard is my name for a collection of Vulkan objects that can send geometry and an associated uniform buffer object to a graphics pipeline.
Note: Recall that a Uniform Buffer Object (or UBO) is an object passed to the Shader programs. It often contains the transformation matrix as well as any other useful variables for the shaders to process the geometry correctly.
This functionality was previously part of a GChunk, but we have extracted it out and placed it into a GShard. This means we've changed the design of our engine to include the following:
In effect, we've added another layer of abstraction to cover a common use case. The shard holds the buffers for the vertices, the UBO for the matrices and the Vulkan descriptor sets which describe these objects. The Shards also contain a record commands function that can be called by the parent GChunk when that chunk is being prepared to be drawn.
Fundamentally, we want to come up with a mapping between two representations of our graphics. On the CPU, Game-engine or user side, we have our scenegraph, which I talked about previously. On the Vulkan, GPU side we have the...well... Vulkan stuff. We want to make the user side as intuitive and quick to use as possible. The Vulkan side just needs to happen.
The scene-graph is a tree made up of nodes. A node will always have a model matrix attached to it, but it can also have a shader program, textures, lights or geometry as well. Our scene will depend on how this tree is constructed. We have rules for our scene-graph-tree too:
Note: In my terminology, I view the tree upside down. Sounds odd but think of it like a file directory tree or even better, the scene-collection tree widget in Blender. The top is the root - the node that contains everything. As we go down the tree towards the leaves we get more and more specific.
These are (mostly all) the rules for our scene-graph. With this structure in place, we've defined a hierarchy around spatial position and orientation. For example, lets say we have a room with a desk. On this desk is a coffee cup. In our scene-graph we could have the office inside our root node. Beneath that, we have a node containing the desk, and beneath that node we have our coffee cup. By multiplying the matrices as we traverse this graph, we can specify the position of the coffee cup relative to the desk.
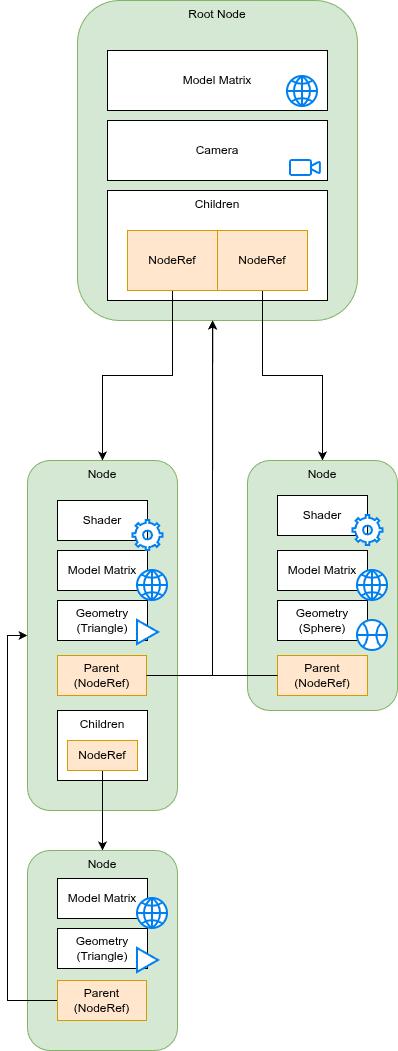
But it's not only positions. The camera, the shader programs and (eventually) textures and lights can all be grouped together in a hierarchy. This will become super handy in the future (when we start looking at skeletal animation among other things). The key to all this is the traversal of the tree. Once the tree has been built, we can traverse it in a particular order to create the GChunks, GShards and contracts. Once we've built these GPU/Vulkan side objects, we can update them frame by frame as the variables in the tree change.
In most programming languages, trees are reasonably straightforward to write. In C++ or C you could use a parent pointer or a vector of children pointers or references. Even better, use a smart pointer. Python is inherently pass-by-reference for complex types like classes and what not, so it's even easier. In Rust however, this is much more complex; Rust is all about memory safety. We can't just have arbitrary pointers lying around.
At first, my Node structure contained a Vector of pointers to its children and a pointer to its parent if it had one (the reasons for this double relationship I shall mention later). However this quickly led to me fighting the borrow checker (as it's known in Rust world). It also resulted in some horrible looking code.
I defined a second type called a NodeRef. It looks like this:
#[derive(Debug)]
pub struct NodeRef(pub Rc<RefCell<Node>>);

impl Clone for NodeRef {
    fn clone(&self) -> Self {
        NodeRef(self.0.clone()) // making sure we increment that internal Reference count.
    }
}

impl PartialEq<Self> for NodeRef {
    fn eq(&self, other: &Self) -> bool {
        Rc::ptr_eq(&self.0, &other.0)
    }

    fn ne(&self, other: &Self) -> bool {
        !Rc::ptr_eq(&self.0, &other.0)
    }
}

impl Eq for NodeRef {}

impl Hash for NodeRef {
    fn hash<H: Hasher>(&self, state: &mut H) {
        let ss = &self.0;
        ptr::hash(&**ss, state)
    }
}
What this all means is that a NodeRef is, itself, its own separate object. It is used to define the relationships between nodes. We can clone a NodeRef, delete a NodeRef, safe in the knowledge that the underlying Node is not messed with. Our tree is constructed of NodeRefs. We can also define the comparison between a NodeRef and another NodeRef: are they pointing to the same node? With that in place we can define our node like this:
#[derive(Clone, Debug)]
pub struct Node {
    pub label: String,
    pub model_matrix: Matrix4<f32>,
    pub geometry: Option<Arc<Mutex<Geometry>>>,
    pub vertex_shader: Option<Arc<Mutex<Shader>>>,
    pub fragment_shader: Option<Arc<Mutex<Shader>>>,
    pub camera: Option<Camera>,
    pub visible: bool,
    children: Vec<NodeRef>,
    parent: Option<NodeRef>
}
There are a lot of _Option_s in there but there's not much that can be done about that.
We will use in-order traversal for building our objects. In this algorithm, we follow the tree downwards until we get to a leaf node. We then go back up the tree and process any remaining leaves at that level. When these are done, we head up another level and repeat the process. There are two major ways of implementing this traversal - using recursion or using a stack. I personally think recursion is more elegant in terms of understanding and definition but perhaps not the greatest in terms of performance or bug hunting. I suspect a lot of keyboards have been hammered in typing out the words for why one is better than the other but for now, I'm going to go with the stack based approach.
When we just had GChunks, this process wasn't too tricky. However, we now have GShards as well as cameras. But we can get some basic rules together for our algorithm:
We do need to watch out for edge cases and failure cases though, which is it's own blog post I expect. For now though, we can build some simple scenes.
Every frame, we will traverse the tree and update the matrices from the nodes and the cameras - in turn updating the UBOs via the contract we setup. At this point we've bridged our scene-graph with the vulkan representation.
So far, I've assumed that the tree structure is fixed and never changing. Now for the most part, we want that to be true. Altering this structure while the program is running would be somewhat inefficient. If we don't want to draw a particular item, it might be better to just ignore it for now. We can have a visibility flag set. That way, we don't need to shuffle data back and forward as much.
However, this won't always be the case. We will definitely want to alter our scene-graph live. This can be broken down into two steps: firstly, removing any dead GChunks and GShards and secondly, creating any new ones.
The creation step we've already discussed. But deletion is quite tricky - extra tricky because we are writing this all in Rust. Trees are often built using pointers (or whatever is analogous to pointers in any language). Rust hates pointers so we need to use - at minimum - a smart pointer. This is usually an Rc, RefCell or combination of the two.
Deleting a node from a tree means removing any pointers we have to that structure. By storing the pointer to the Node's parent we can access the parent and remove the node we want to delete from that parent's children vector. This is why we keep a pointer to the parent as well as a list of children. Because we want to add and delete from a tree, it's a little easier if we keep both children and parent information for a particular node. It's not the most memory efficient but for now, it works well enough.
It's also useful for another feature - we need to define another rule:
This is quite a brutal rules in a way but at least it's cleaner. We can only have one root node after all. What do we do the pruned off branch if we delete a node? We could delegate a new node to graft it onto but for now, just deleting the entire sub-tree is a little easier. If the end user wants to move a subtree before deleting a node they can do that themselves if they like. In fact this is quite an important point...
Note: We could add extra functionality to our tree deletion, be smart or add extra requirements to a deletion. But sometimes, that functionality is best expressed at a higher level, if at all. If the user wants to attach a subtree somewhere else, it's better to let them do that their way and keep our special functionality simple and consistent.
We need to remember our contracts. In this particular scenario the contracts are held by the current Scene as smart pointers. If the smart pointer to a GShard has a count of zero, we know that it needs to be deleted. But deleting GChunks and GShards is a more complex and serious operation...
So if we are deleting an entire sub-tree, or even the entire tree if we are closing the application down, we need to be a little bit careful. Deleting nodes is fine, but we must match these deleted nodes to their GShards and by extension, their GChunks.
In almost every Vulkan tutorial, you'll see the phrase "frames in flight". We typically have 2 or 3 frames being constructed or ready to be presented for viewing on screen. Not only that, our Vulkan drawing operations are taking place on a separate thread to our scene-management thread. If we delete a node, we can't just delete it's GShard straight away.
It gets more complicated! We can't delete a GChunk if it contains GShards; we must delete the GShards first. Given our rules of how our tree is constructed we know that if we have multiple GShards inside a GChunk they must correspond to at least one node with at least one child. The parent node must have a shader attached to it and it and it's child must have geometry attached as well.
Therefore, if we have to delete all the GShards first we must delete all the child nodes first.
Once we've gotten rid of all the GShards inside a GChunk, we can remove the GChunk. But removing a GChunk is also difficult when we have multiple frames in flight. We can't delete a Graphics Pipeline if Vulkan is still using it, or delete a command buffer if a GShard is currently recording commands to it.
Lets start with the threading/frames-in-flight issue. The way I've solved this is to stage the deletion. We can mark a GShard for deletion but we don't delete it immediately. When a GShard is marked it is ignored until all the frames have been completed. When we come back around to the frame number when this GShard was marked for deletion, we finally delete it. This gives Vulkan a chance to finish off all the frames for this GShard without scheduling any more. We use the same marking and timing method for the GChunks.
The second problem we can solve using post-order traversal. In this traversal method, we visit all the leaves of a tree first, ascending when there are no more.
Clean-up in Vulkan is tricky. It's made more tricky by using multiple threads and multiple frames.
One of the things I really like about Rust is how easy it is to write tests. I rarely meet anyone who likes writing tests, but they don't half save time! I think they should be made as easy as possible to get up and running. For my nodes, writing a test is as simple as adding the following to the bottom of the source file:
#[cfg(test)]
mod tests {
    use super::*;

    #[test]
    fn node_ref_equality() {
        let node_a = Node::new(None, None, None);
        let node_b = Node::new(None, None, None);
        let node_a_clone = node_a.clone();

        assert_eq!(node_a, node_a_clone);
        assert_ne!(node_a, node_b);
    }
}
We can run all our unit tests as follows:
cargo test --lib -- --show-output
I don't always need the show-output option but it's nice to have on occasion. The lib option is there because I'm testing a library function. Love it!
Testing graphics programs can be tricky as the output is often an image of some-kind when you start looking at output. Reflecting on the internal state of a GPU to make sure all the memory is setup how you want it is something I don't know how to do yet. More experienced graphics people will need to be consulted.
At this point we are close to having what we need to make our first test program. We could use the library assimp to load a model and display it on screen. However it would look a bit poor as we don't have any lighting solution yet, nor do we have any texture support. We should also look at contracts a little more closely too. It would be nice to have one or two arbitrary parameters in our shaders, like a colour or a global timer. Once we have these in place, we can build a basic 3D object viewer. That's our target for the next chunk of time.
