
So this year, I went to my first festival since the pandemic - the hacker camp Electromagnetic Field 2022 (or emfcamp as many folks call it). Contributing to the festival was the demoparty FieldFX. I decided I'd like to enter a demo, building on my ZX Spectrum work. I thought I'd use this opportunity to talk a little more about programming the ZX Spectrum, delving a little more into the graphics and sound.
If you can't wait, you can see the demo in the video above. Alternatively, you can download the tap file, browse the entry on pouet, or take a look at demozoo.
The ZX Spectrum 48K has an effective screen size of 256 × 192 pixels. We have a choice of 16 colours, 8 normal and 8 bright versions of the normal colours, including everyone's favourite bright black. Wikipedia has a pretty good writeup on the various colours and graphics abilities of the Speccy and is worth a read.
Drawing on the ZX Spectrum is a tricky affair. The Spectrum was somewhat designed around text, so the layout of the screen memory was built to facilitate this. Graphics memory starts at location 0x4000 and you'd think it would be linear? Sadly, it isn't. You can read an excellent writeup of how it all works - I've borrowed the video and code and reproduced it here. It's easier to see rather than explain.
If we start with this BASIC program, filling the video memory in a linear fashion, we get the following video:
10 for i = 0 to 6144
20 poke 16384 + i, 255
30 next i
What we have are three banks of memory. The screen is filled by each bank, in order from top to bottom. Each bank is filled by filling in the pixel row of each character line. Once the first row of each character line is filled, we move on to the second, and so on. Each character line is a byte long, with each bit representing one pixel.
What are the implications of this? Firstly, we don't draw single pixels. We draw 8 pixels at a time, in a line, using a single byte. This leads into why we have the classic ZX Spectrum look of colour clash. When we set a colour, we do so either per character pixel row (8 x 1) or more commonly, per character (8 x 8). The second implication is that we need some funky code to figure out where the next memory position is, if we want to address the screen using our standard X, Y co-ordinates.
Fortunately, the famous demoscener and musician Gasman has a github repository with a handy number of useful routines, including one that works out where the next Y position in memory for drawing would be. I've reproduced it here:
; Given an address in screen memory in DE, return the address of the next pixel line down

upde:
        inc d
        ld a,d
        and 7
        ret nz
        ld a,e
        add a,32
        ld e,a
        ret c
        ld a,d
        sub 8
        ld d,a
        ret
I'm not going to go into this in to much detail. Suffice to say, if we place 0x4000 into register pair DE, then call this function, DE will be set to the next line down.
I know it sounds a little crazy but we have the beginnings of a demo right here!
How? Well it's now possible to draw a line, byte by byte, find the next line and draw that, byte by byte, continuing until we are done. We can draw single colour bitmap images to the screen. That should be enough to get us going. I wrote a python script that converts simple images into a block of bytes (it's in my github repository). Finally, we need some sort of drawing routine that looks at a block of memory and draws that block to the screen. This is also in the github repos but I'll reproduce it here too:
image_width:
    defb 0
image_height:
    defb 0
image_x:
    defb 0
image_y:
    defb 0
image_offx:
    defb 0
image_offy:
    defb 0
draw_set_pos:
    ; Call this first to set DE to the correct drawing position.
    ; TODO could be a bug here if offx is 0 to begin with
    ld a, (image_offx)
loop_offx:
    inc de
    sub 1
    cp 0
    jr nz, loop_offx
    ld a, (image_offy)
    ; Now loop through the y offset
    ; upde uses the accumulator so we must be a bit more clever with offy loop
    ; TODO we always go one line down first. Naughty but easier :/
loop_offy:
    push af
    call upde
    pop af
    sub 1
    cp 0
    jr nz, loop_offy
    ret
draw_bitmap:
    ; Now we have our final start position in de so push it
    push de
loop_draw_bitmap:
    ; Now draw the next block of 8 pixels
    ld a, (bc)
    ld (de), a
    inc bc
    inc de
    ; read the x pos and subtract. Call next line if needed
    ld a, (image_x)
    sub 1
    cp 0
    jr z, next_line
    ; write the xpos back to memory
    ld (image_x), a
    jr loop_draw_bitmap
next_line:
    ; take the saved width and reset the x counter
    pop de
    ld a, (image_width)
    ld (image_x), a
    ; Now check that y isn't 0
    ld a, (image_y)
    sub 1
    cp 0
    ret z
    ; Write new Y-pos back to memory
    ld (image_y), a
    ; Find the next line down
    push bc
    call upde
    pop bc
    push de
    jr loop_draw_bitmap
This seems like a lot, but it's simpler than it might look. The first few parts are the parameters to the function: how wide and tall is the image, where should it be draw to the screen and how much of the image have we drawn. These memory locations need to be set with the appropriate values first.
Next, we set the starting position of where we want to draw. This is the draw_set_pos, loop_offx and loop_offy parts of the function. We need to find the starting location in memory of where we want to draw our image, starting from 0x4000 and working forward. The origin of our image is the top-left, so image_offx and image_offy are the distances from the top left of the speccy screen, to the top left of our image. Notice, we are calling the upde function we defined earlier.
Finally, we actually start the drawing in the draw_bitmap section. This consists of a couple of loops, based on the width and height of the image we set at the start. We take a byte from where our image is stored, and copy it to the screen memory. We move one byte along in both screen and image memory and continue, subtracting one from our counter image_x. When image_x is zero, we call upde, decrement our image_y counter and set image_x back to its original value and continue. When image_y is zero, we know we have finished drawing.
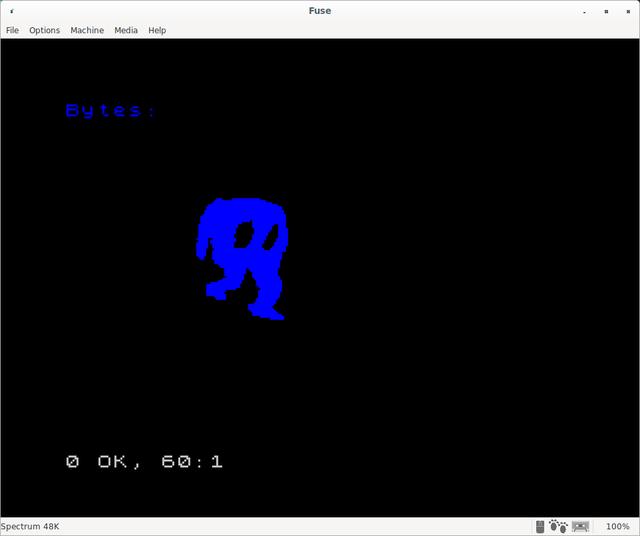
This is not the most efficient drawing method I expect, but I worked it out with a bit of help so I'm happy with it. We can draw simple, one colour images like the one below:
The demo makes extensive use of this function. It's pretty much the backbone of the whole thing. Making this faster, with the ability to use colours would be the next logical step I think.
The speccy 48K has no sound chip, just a little beeper. Nevertheless, it is possible to create some amazing music. Just have a listen to this:
I doubt I'll ever get that good! Still, we can do a lot with the simple sound routine that exists in the speccy's ROM. Recall that the ROM lives in memory location 0x0000 to 0x3FFF. The following code makes a call into the ROM and produces a short beep:
basic:
ld hl,noteC1        ; pitch.
ld de,noteC1DH      ; duration.
call 949            ; ROM beeper routine.
ret
We load hl with the pitch for note C, octave 1, and set de with the duration for this note. By turning the beeper on and off very quickly, we can generate the sound we want. For example, the note A is exactly 440 Hertz. If we turn the beeper on and off that fast we'll generate an A. This beeper routine I found online at chuntey.wordpress.com. The author goes into quite a bit of detail on how this works, but all we need to know is what do register pairs de and hl need to be set to in order to produce the note we want.
The formula given in that blog-post is as follows:
DE = Duration = Frequency * Seconds
HL = Pitch = 437500 / Frequency – 30.125
With this, we can work out as many octaves as we want. Recall that there are 12 notes in an octave. A note in a higher octave has double the frequency of it's lower relative. For the demo, I needed around 3 octaves. Each of these 3 octaves needed quarter and half note variations (eighth and quarter of a second respectively) - phew!
The demo has a couple of effects you might have spotted - we have a couple of pitch-bends and a couple of noise effects in there. Both of these I copied from chuntey.wordpress.com and they work pretty well.
All of the sound routines can be found in my speccy repository on github with more explanation on how to use them.
I decided that once I'd learned to do basic sounds and graphics, I'd start thinking about a demo. Simple animation is possible by showing an image then blanking over that area and drawing again. A simple sound-track is now possible with the above routines so all we need is a theme.
I decided to go with the classic You Wouldn't Steal a Car public service announcement from the early 2000s. This short movie has been parodied so much it has now become a meme - most famously with the phrase "You wouldn't download a car". The whole thing is essentially, sarcastic - you absolutely would download a car.
I decided I wanted to take a swipe at the whole NFT thing and the idea that right-clicking on a bored ape and saving it to disk was the same thing as stealing (obviously, it clearly isn't). The whole NFT business is ripe for a good piss-take, and so having the advert recreated on the Spectrum would be extra funny - a machine totally incapable of dealing with NFTs but perfectly suited to taking-the-micky out of them.
My lovely wife is a musician so I roped her in to figuring out the music. We wrote down a rough version of the music with some basic notes. I then placed them into milkytracker (the tracker I used previously in the FPGA Demo) to make sure it sounded right.
As the Spectrum doesn't have any multiprocessing capability, or any sort of sound hardware, we need to advance the sound-track in between the graphical drawing. This is handy as we can use the time spent playing music to create pauses between the scenes and when the words appear. This works pretty well, except for the scene where we draw the bored ape. Since this is a large image, it takes just a little bit too long to draw and the music stalls a bit. Nevertheless, it's just a minor glitch.
We know how to draw to the screen now, so we just have to draw the images we want. The font used in the advert is XBand Rough, which is enough for most of the demo.
Each scene is a separate asm file, in order to keep things manageable.The various routines are held in library asm files, as are the individual images, exported to the spectrum memory format by our python script. With all this in place, we have a finished demo!
Developing a retro demo usually involves modern development tools, like a good text editor, cross-compiling and an emulator. I'm sure some folks still develop their demos on the actual machine, but I suspect the majority use modern machines. However, I don't think it's really a proper demo until it's been tested on an actual machine. Fortunately, I have a ZX Spectrum 48K with a DivMMC all ready to go, so of course, I had to see my demo running on real hardware:
Field-FX was a lot of fun! I had a great time seeing all the new folks and the demos they made. Out of 4 entries I came a very close second. The winner - The Green machine - was a very impressive demo indeed. However, my demo got the biggest laughs and cheers of the night - people seemed to really love it! While my demo is not the most technical by any stretch, it is right on the pulse, message wise. As I said at the end of my last blog post on demos, know your audience.
It took a while to get this demo together. It was done on my laptop whilst sitting on the sofa in these snippets of free time you get of an evening. It was very unlike my other projects where I'm up in the office working for several hours, or out in the workshop scratching my beard with a cup of tea. Slowly chipping away over a few months, learning as I go. It was quite peaceful and low stress.
There are many ways to improve this demo I'd say. First and foremost, some sort of noise or scaling effect on the text. It really should pop in, and bounce around a bit before it stops. I'd have to improve the bitmap drawing routine I think.
The next demoparty in the UK will be NOVA, on the 12th to the 14th of August.
