
For Revision 2022 - the world's largest demoparty - my friend Will Flux and I entered the Wild Category with a demo of our own - a completely unique FPGA board running a short visual and audio treat. Completely designed in Verilog and unlike other demos we used no libraries, no code, not even a CPU! We didn't even use a development board. Everything was made from parts we bought from places like Farnell and Mouser. This is a short blog post on how we went about it.

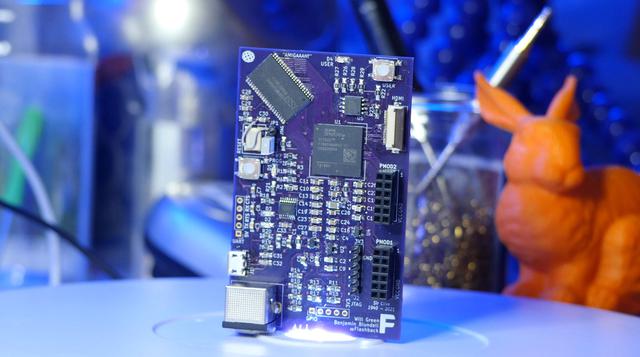
The small board we designed is built around the Xilinx Spartan FPGA. This lovely little bit of silicon generates the HDMI video signal and the sound. We have a small flash memory chip to store the hardware configuration binary, a 4MB SRAM chip, a 100Mhz oscillator, a PMOD connector and an SDCard connector on the bottom side.
Most of the space on the board is taken up with the parts needed to generate the 4 different voltage levels we need on this board: 5, 3.3, 1.8 and 1V levels! Quite a few!
Sound was initially passed through a PMOD amplifier from Digilent, but in the end, we settled on driving the sound directly from a pin.
The board we've designed is the second major release of our design - called Flashback (the first was called Frontier - all Amiga game references you see). However, since Will and I started this project we've built and designed at least 4 prototypes before getting to this one. We started with seeing if we could get an FPGA to flash an LED - the typical 'Hello World' of hardware. It's a good place to start as this would require getting the voltages and clock signals right - a major part of any subsequent project.
For the most part, the power rails aren't too difficult to get working - i'm sure there are some areas I could improve on. Keeping the capacitors close to the pins on the FPGA, making sure power lines didn't run too close together and paying close attention to the data-sheet got us a long way. We had some brief issues with the oscillator, when I realised our footprint was actually flipped, but aside from that, the first prototype went well. BGA soldering with the largest pin-pitch on offer really helped. I'd hate to have to go down to a tiny pitch and attempt to place that by hand! The largest pitch Xilinx offer the Spartan in is 1mm, on a 15 x 15 mm package. This seemed to work fine for me, but I don't think I could go any lower without a proper solder mask and a pick-and-place machine.
With the power rails, oscillator and FPGA in place, we moved on to HDMI. A HDMI video signal requires very fast and accurate signaling. There are 8 main wires, in 4 differential pairs, required to send a picture to the screen. In addition, there is an encoding standard called Transition-minimised differential signaling(or TMDS) that you need to apply to any signal you send down the wire. At first, we tried to use a special TMDS buffer chip to strengthen the signal, but I had terrible trouble soldering it to the board. The chip comes as a QFN, or Quad Flat No-Lead. I found this package incredibly difficult to work with; the footprints are too small for the Mylar solder masks I was using - using solder paste and a reflow oven wouldn't have worked. I tried hand soldering but the video signal was still not correct. Not having a logic analyzer not even capable of sampling the clock, let alone the HDMI signals, we decided to give up on the TMDS chip and have the FPGA send the HDMI signal down the wire directly.
When we started out with HDMI, I used a standard connector that would take the normal HDMI plug. This connector proved difficult to solder, so I hit on the idea of using a Flexible Flat Cable (or FFC) connector and making a separate board with the normal HDMI plug on it. The reason was at the time, we weren't sure if the TMDS chip would work, so hedging our bets, we put two smaller FFC connectors on the board - one connected to the FPGA directly and the other to the TMDS chip. That way, if one didn't work, we'd still have the other. The FFC connector stayed on for the next revision as it takes up less space, reducing the board size and saving us a little money. However, this connector proved very fiddly. Several times I thought I'd broken the board, only to discover the cable had not made good contact, or the soldering hadn't gone well. In future versions, I'll go back to the original connector.
There is one mistake on this board that eagle-eyed types might have spotted. I missed routing a tiny trace from the oscillator - how I don't know as I always run the automated checks. I had to use a small bit of wire to link two pads together to fix it. This sort of thing is common I'm told though it's still annoying.
Verilog isn't a programming language, and going in with that mindset will get you stuck. Well, sort of. I'm a programmer by training and experience, not an electronic engineer - looking at Verilog with a programmer's eyes. Sequential logic versus combinatorial logic, time domains and blocking versus non-blocking assignments are tools that don't really have analogues in most programming languages. It took me a fair bit of time to get back into the design way of thinking. Thankfully, Will had done most of the heavy lifting, leaving me with just the sound, metaballs and putting it all together. It's great when you get to work in a good team!
Our demo consists of a number of classic effects from back in the day:
Will wrote most of the effects and you can find some excellent descriptions of how to write rasterbars and star-fields on his verilog page.
My contribution was the Metaballs effect. In a nutshell I used a fixed point verilog module from a website to form the core of the effect. A couple of simple SRAM style buffers are used to write the results of the metaball algorithm and draw to the screen respectively. Finally, we flip the buffers once the first buffer has been filled, drawing the other buffer to the screen.

The metaball algorithm is relatively simple. If we have a number of circles (or spheres if we want to go 3D), we have a point and a radius, and an area we are working over. In our demo we have an area 80 by 60 units in size. At each cell on this grid, we want to work out it's distance from each of the three metaballs, and thereby each of the metaball's contribution to that cell. If it's less than the radius of the current metaball we are considering, it's inside the circle and therefore at the maximum. If the cell is outside then the cell's value is worked out using a falloff function.
The further away our cell is from any of the metaballs, the less chance our cell should be filled. After some threshold, we don't need to do any checking. Typically, the inverse square law is a good place to start. In 3D, it looks like this:
The problem here is there is a square-root and a divide - both costly to run and difficult to design. There are some tricks we can use to make this a bit easier in Verilog.
Firstly, we can used fixed point arithmetic as we don't need super high precision. I found a fixed point library way back in 2018 but Will now has a tutorial on the topic. This makes the division part possible. A little re-arranging of the formula to include the radius of a particular metaball and we can remove the square- :
We solve in a relatively small space then scale up to our full resolution (this is why things look a bit pixellated). Finally, we take a number of bits in the final number as an index into a palette table to obtain the final colour.

I'm terrible at music! I've tried various instruments over the years but nothing ever settled. But now I also have to make the instrument I need to play! Nightmare!
Fortunately, FPGA4Fun has a guide on how to build a music box. I figure this is a pretty good starting point. Although it's only a single channel with a small number of square-wave tones, it's enough for now. But how to generate the notes?
Classical music is always a good option, and hearkens back to games like Frontier: Elite2 and what not. I quite like In the Hall of the Mountain King by Grieg and a MIDI version was readily available.
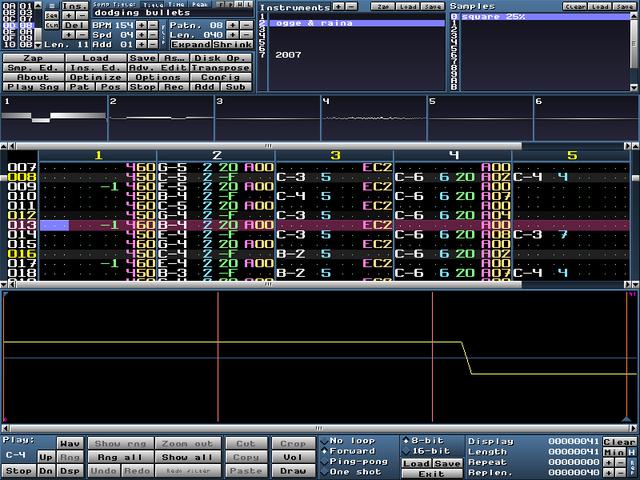
However, the problem I found with MIDI is that it seems to be quite variable and somewhat complex. I had a lot of trouble getting the right notes out of the MIDI file I had - the music just sounded wrong, so I looked for another format and settled on MOD. MOD files store what is known as tracked music. The format was originally designed for the Amiga - Ahoy has an excellent video on youtube on tracked music. To work with tracked music you need a tracker. I found one called Milkytracker which runs on modern systems. Even a cloth-eared programmer like me can figure out roughly what is going on. I found a python library for reading MOD files so converting the notes into our Verilog code is fairly easy.

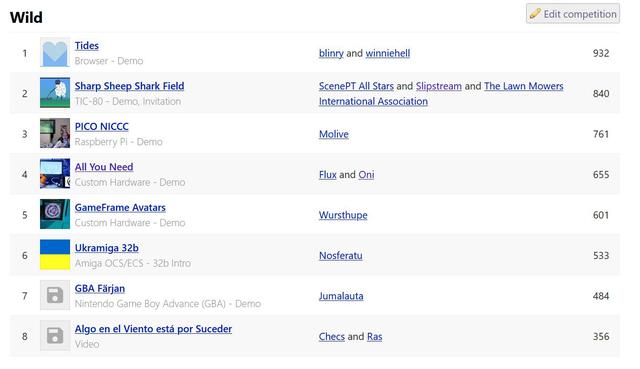
In the wild competition we placed fourth out of eight entries. Not bad. I was really hoping for a place in the top three, but I suspect my terrible music let us down. That and the fact that we didn't really show off all the things we'd done to get as far as we did. It's a hard concept to sell to people - a totally custom machine - like totally custom. Still, I'm glad to have entered. With projects such as this, I think it helps to have a goal in mind, otherwise you never really finish. It was pretty tough during the final few weeks - staying up late and hoping you haven't just bricked or broken both boards you've spent months perfecting.
The sound is the weakest part of the demo in my opinion. We had a few comments about it - my favourite was "everyone's ears have been de-gaussed". That said, we had nothing to begin with and managed to get a reasonable sound out of the board. There are a number of Verilog designs out there for sound chips, including the sound chip from the Original Gameboy. If i'd have been more confident and had more time, this is the route I'd have gone down, though writing the music for said chip would have been more difficult.
Revision 2022 was a weird one in my opinion. Many of the big names didn't enter this year. Word on the street is that people are saving their work for the in-person parties, post pandemic lockdown. It's the first Revision where there weren't enough PC64K demos available to run the competition, which surprised a lot of folks.
Ultimately, I don't think the demo really showed off what we made and the efforts that went into it. I think perhaps showing off a selection of different chips - say the SID followed by Amiga Paula - might have really made the crowd go wow! The power of an FPGA is that it can be setup to be almost any hardware. Our demo doesn't quite show this, nor is it easy to appreciate the effort of getting HDMI working. In the end, we did ok but I think there's truth in the old saying 'know your audience'.
In the future, we'll likely publish the Verilog for this demo, maybe with a modification to get it to work on more common FPGA development boards like the Arty.
