
Every year in our family, we have a Sibling Santa draw, where we reveal who is giving gifts to whom. We like to do something silly and a bit different. One year, we did an alternative Christmas Message from the Queen using some Deep fake technology. This year, we've gone for some more Artificial Intelligence shenanegans with our latest creation - Artbot!
The video we put together combines some Stable Diffusion generated art-work, some GPT-2 generated scripts and some synthetic voice generation - text to speech. Each of our siblings were asked who their favourite artist was. We took this and generated an AI artwork in that artist's style, the topic being who was giving to whom. We then put all these artworks together in a spoof art review interview program where my partner interviews the artbot about their work. It felt like a good time to try out these technologies as they have been in the news quite a bit.
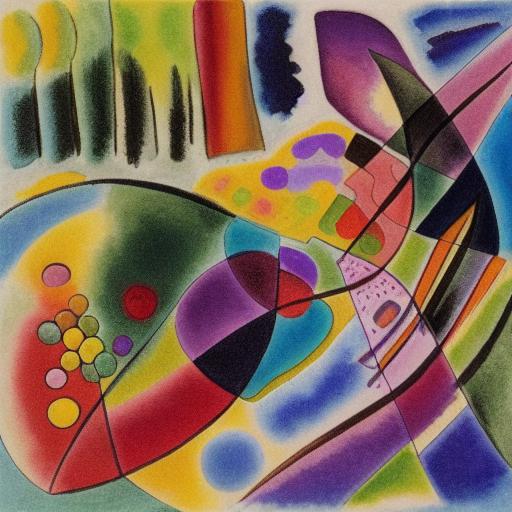
Stable Diffusion is the new hotness when it comes to AI generated Artwork. Unlike DAL-E 2 and Midjourney, it can be run on a local system with only modest requirements. Even a recent macbook should be enough.
We started out using with Stable Diffusion from Hugging Face. For these not familiar, Hugging Face is a repository of sorts, full of models of different kinds. One needs to sign-up and install a small python API to get started. With that done, it's possible to download a model of your choice. A model is typically comprised of two things - the code and the weights. The code is usually quite small, but the weights can be quite large - several gigabytes in the this case.
To begin, I downloaded the stable diffusion code from github. next, I had to get hold of the weights. The Stable Diffusion Page on HuggingFace has the weights required. There are a few different versions - I went with 1.4. Once these weights are downloaded you need to place them in a particular directory, The github repository has the details but it's basically just a symlink to the chkpt file. You'll need to setup some sort of conda environment, or just make sure you have all the required python libraries installed.
At this point, you can fire up a terminal and get to work, generating the art that you want.
python scripts/txt2img.py --prompt "a photograph of an astronaut riding a horse" --plms --ckpt ../stable-diffusion-v-1-4-original/sd-v1-4.ckpt --n_iter 5 --n_samples 1
However I found it much more useful to use a web based interface.
I had a few problems generating images using the terminal - stable diffusion was using too much memory. That, and it was a bit clunky having to load the model, generate an image, have the model closed, then start all over again. Ideally, I wanted to keep the model in memory and generate a number of images. It was suggested that I use a web based interface, so off I went looking for some.
I settled on stable diffusion webui on github as it seemed pretty easy to install and had all the features I needed. There was one file that needed changing - set the --listen flag in the webui-user.sh file. This makes the program listen on all interfaces, so I could access the server remotely. As my AI box is a headless machine somewhere on the network, this was essential. With that done, all one needs to do is run the webui.sh script and off you go!
Rather than write a script for the artbot ourselves, we thought it would be more appropriate to generate one using some AI model. GPT-2 seemed like a good choice as it's pretty easy to access. Again, Hugging Face has a GPT-2 page. You can get prompts right away in the browser window if you want, but I decided I'd like to run it locally.
To do this, you need a HuggingFace account and the python API. Fire up a python prompt and run something like:
from transformers import pipeline, set_seed
generator = pipeline('text-generation', model='gpt2')
set_seed(42)
generator("Hello, I'm a language model,", max_length=30, num_return_sequences=5)
We came up with one half of the script, then set GPT-2 to filling in the second half. It seemed to work quite well although much of what was generated was nonsense.
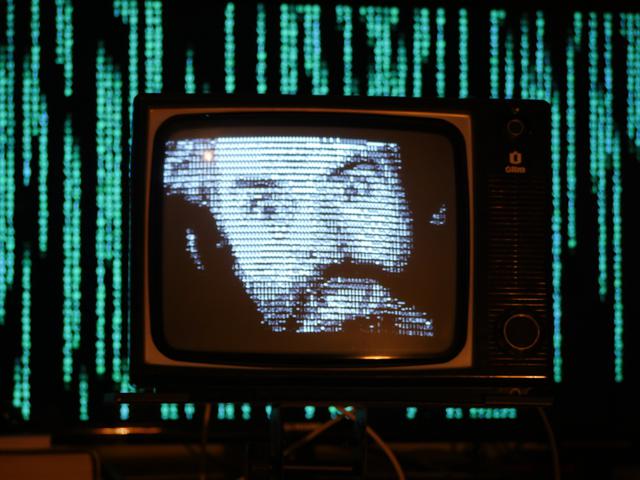
I had the idea of making the ArtBot look a little retro. I have a really old black and white television that I thought would look the part. If I could link a computer to it, I could do some sort of animation of a robot's face. However, old televisions were typically setup to receive UHF signals from analogue TV stations. You need a UHF modulator in order to convert the signal to something that an old telly will recognise. Fortunately, I had one lying around. Had I not destroyed the one in my ZX Spectrum rebuild I've had had two!
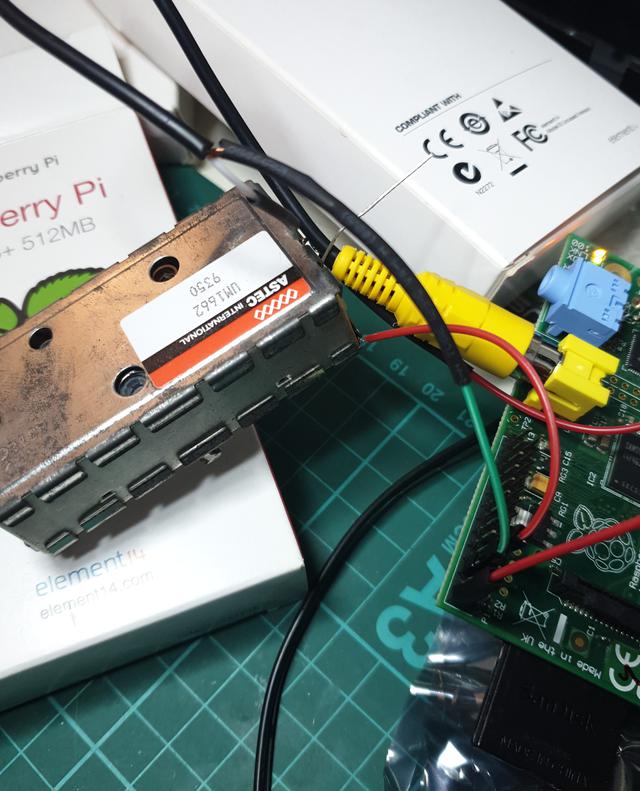
Wiring this up was pretty easy, although do make sure (if you try something like this) not to let any of the wires touch the casing. The casing itself is the earth point and needs to be wired into your common ground. I had to solder some wire directly onto the case itself, then wire into the ground. Anything touching the case will be grounded, and that might mean you get no signal. This modulator will do sound as well as video. There are 5 connections: ground, +5V, Video in, Audio In and output. Three wires need soldering and one additional wire needs soldering to the casing. The RaspberryPi has ground and 5V pins on it's GPIO headers.
I have a load of old Raspberry Pis knocking around so I thought it would be a fine idea to put them to good use. The composite output is very handy here - we can wire it directly into the UHF modulator. This seemed to work quite well, however these Pis are quite old and slow these days. Actually getting a useful desktop over the composite video was more of a challenge than I thought. I settled for Raspbian OS Legacy (no Desktop) version for this Pi and it worked a treat. I figured that ASCII art was the way to go for this project - suitably retro.
The ASCII art side proved a bit of a challenge. At first, I thought I could use a variant on telnet, bash and the like. Something akin to the following:
curl -s http://artscene.textfiles.com/vt100/movglobe.vt | pv -q -L 9600
Go on, give that a try in your terminal! The page http://artscene.textfiles.com/vt100/ has loads of these animations.
In the end though, I settled for mplayer. I figured that the plan would be using my webcam to record videos of my face, then passing it through some sort of ASCII filter. There are two libraries that do ASCII art conversion - libcaca and aalib.
Playing with caca is relatively straightforward. The following set of commands will install youtube-dl, then download a video and play it through mplayer in ascii format.
sudo apt-get install mplayer caca-utils
sudo wget -qO /usr/local/bin/youtube-dl https://yt-dl.org/downloads/latest/youtube-dl
sudo chmod a+rx /usr/local/bin/youtube-dl
youtube-dl -o- "https://www.youtube.com/watch?v=dQw4w9WgXcQ" | mplayer -vo caca -
However, this didn't quite give me the effect I wanted, so instead I tried aalib. I shrunk the videos down to a low resolution of 160 x 120 pixels, as playback through these filters on the old RaspberryPI is pretty slow at high resolution, plus it looked a little bit better.
mplayer -vo aa movie.avi
There are options to adjust the contrast and what not, if required.
Rather than use my own voice to read out the GPT-2 generated lines, I thought it would be more fun to use a Text-to-Speech system. There are loads of them about these days, but which one to choose? Ideally I wanted one that was just uncanny enough to seem robotic, yet clear enough to be understood. I had a voice in mind but couldn't find the synthesizer it belonged to. I was made aware of TikTok-TTS - a site that allows access to the TikToK text to speech API through a webpage. I suspect this is a clever hack and in no way supported by TikTok but that's fine by me. Some of the voices are pretty funny - I went with UK Male 2 in the end.
With all the pieces in place, it was time to film. I put ArtBot in front of our living room TV, set a Matrix screensaver going and got to filming. For the scenes where my partner was interviewing ArtBot I used the same camera, but placed a shotgun microphone close to her chair whilst filming.
Everything was cut together using kdenlive on Windows.
I'm pretty happy with the result in the end. Lots of pieces of technology managed to come together. My one regret is that the AI voice does not always sync up with my own lip movement - it really takes you out of the moment. However, all in all, folks were impressed and seemed to enjoy it. I'm glad I've finally gotten to mess with GPT-2 and Stable Diffusion - they are a lot of fun and quite impressive.
