
For ages, I've wanted to do some sort of alternative Queen's Speech. For these not familiar, the reigning monarch in the UK gives a speech, recorded earlier in the year, but broadcast on Christmas Day. Personally, I'm always a bit fifty-fifty on it, but I do love a good parody. Since Deepfake technology has been mentioned rather a lot in the news -and because I work in A.I.- I felt this year was the perfect time. I decided to make an alternative speech and send it around our family members to spread a little Christmas cheer while we are locked down.
Deepfake technology is somewhat problematic to say the least, given the ways it's often used. I assure you dear readers, this project is all above board and in no way condones deepfake technology being used to attack anyone personally.
Here is a clip from the final result. I've trimmed it down from it's 6 minute run-time. It turned out not half-bad I reckon!
Deepfake technology tends to rely on Generative Adversarial Networks (or GANS), along with a number of other related technologies such as face detection, face modelling and so on.
To convert one video to another, one must extract the faces in question - the ones to replace and the ones doing the replacing. I'm a little hazy with the next part but I believe a model of the face is either created or chosen; a set of key points for the various facial features. The next step is to train the network on these sets of faces. This process can take a while depending on your hardware setup. Finally, each frame in the target video is passed through the network and spat out with the old face replaced by the new, hopefully with the correct expression. We combine these frames back into a video and hey-presto - we're done!
In truth, one doesn't need to know the details of the process - it's said that using this technology is more like an art-form or craft. I didn't have the time to do a deepdive on the methods - maybe I will one day as it is very interesting. However, if you are keen here are some handy links:
I had a look at various projects, but ended up settling on faceswap. This is a Python program based upon Tensorflow. I also considered DeepfaceLab but had little luck with it. My AI box is a headless Linux machine so anything that needs a GUI wasn't going to cut it. Faceswap does offer a gui, but I found the command line interface good enough. I'm told that it's worth doing a few manual tweaks here and there but since I had little time and was happy with a rough cut, I figured I'd leave the GUI alone.
Filming took place in our little flat. We had some ideas early on about filming outside, potentially at the ruined castle here in St Andrews, but lockdown put paid to that idea. This was a blessing in disguise really because it turns out that lighting plays a really important part in the final result. Being inside meant we had a bit more control, despite not having any studio lights - just big windows and a few standing lamps. They'd have to do.
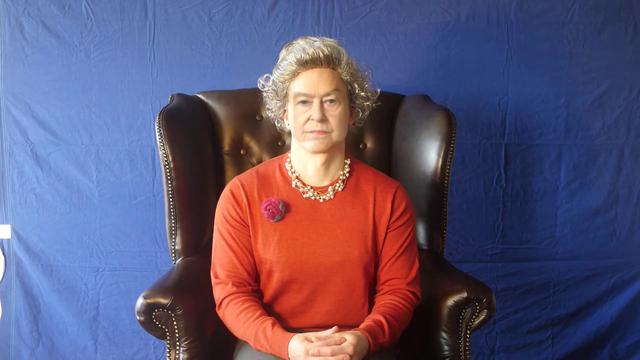
At first, we decided to light my face as evenly as possible, removing any shadows. The problem we found later when we ran our first deepfake test is a dark line would appear down the middle of my face. The result looked terrible! I wondered what it might be? Turns out the Queen is always lit from one side - a shadow always appears by her nose. If this shadow isn't there on my face, the neural net decides to add it! Disaster!
Filming took quite a while, so with considerable reluctance we decided to try again. This time, we would light my face from one side in order to match the source footage. The results were much better! The instructions for Faceswap do mention that lighting is quite important, but I figured re-filming might be quicker than finding and checking more footage of her madge.
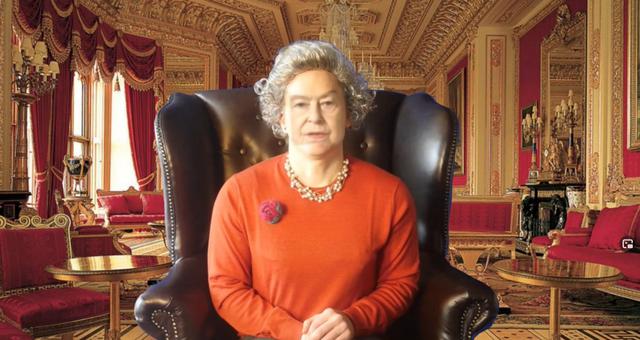
I also wanted to try some Chroma Keying. That way I could pretend I was speaking live from Windsor Castle or some-such place. Sadly, I don't have a green-screen but I do have an old blue bed-sheet. We decided that would have to do. It was quite a challenge to place it up on the wall with no wrinkles and no shadows. The final result wasn't too bad.
I made the mistake of trying to setup Faceswap without conda. It was a real pain! Installing Tensorflow on Linux is still a time consuming and picky affair, largely due to all the messing around with the nvidia drivers and numerous cuda versions. In the end, I caved in and used anaconda - an environment manager (I guess?) often used with Python.
conda create -n "faceswap" python=3.7
conda activate faceswap
python setup.py
Most of my footage of the Queen comes from her Christmas Speeches. The video is of high quality, doesn't feature anyone else and her face takes up a large part of the scene. She's always facing one direction too. This means, during the filming, I can't really move my head in any significant way. The aforementioned lighting is also a problem. So while we can get away with just this footage, any serious attempt at modelling the Queen's face would need video from many other sources. I used youtube-dl to grab a copy of the video.
So to start with, we need to extract faces from the footage of both the queen and myself not dressed up, pulling all sorts of silly faces.
python faceswap.py extract -i /phd/face/queen0.mp4 -o /phd/face/queen -min 128
python faceswap.py extract -i /phd/face/ben.mp4 -o /phd/face/ben
The -min 128 bit is there because I noticed that the extraction would pickup some of the faces on the photos standing on the table next to the Queen. I didn't have time to check all the images - I'd extracted quite a few frames, but I noticed that each face that Faceswap had extracted was given a different number in the filename; fairly easy to remove these we didn't need.
The next step is the actual training:
python faceswap.py train -A /phd/face/ben -B /phd/face/queen -m /phd/face/ben_queen_model -t dfl-h128
There are a number of architectures or models that Faceswap supports:
- original: The original model created by /u/deepfakes.
- dfaker: 64px in/128px out model from dfaker.
   Enable 'warp-to-landmarks' for full dfaker method.
- dfl-h128. 128px in/out model from deepfacelab
- dfl-sae. Adaptable model from deepfacelab
- dlight. A lightweight, high resolution DFaker
   variant.
- iae: A model that uses intermediate layers to try
   to get better details
- lightweight: A lightweight model for low-end
   cards. Don't expect great results. Can train as
   low as 1.6GB with batch size 8.
- realface: A high detail, dual density model based
   on DFaker, with customizable in/out resolution.
   The autoencoders are unbalanced so B>A swaps won't
   work so well. By andenixa et al. Very configurable.
- unbalanced: 128px in/out model from andenixa. The
   autoencoders are unbalanced so B>A swaps won't
   work so well. Very configurable.
- villain: 128px in/out model from villainguy. Very
   resource hungry (11GB for batchsize 16). Good for
   details, but more susceptible to color differences.
I tried dfl-sae and dfl-h128 finding the latter to be slightly better. I've not tried any others - I'm sure I could have gotten better results if I'd played around a little more.
The last steps are to take the footage of me dressed as the queen and apply the trained model to these extracted faces:
python faceswap.py extract -i /phd/face/ben_queen.mp4 -o /phd/face/ben_test
python faceswap.py convert -i /phd/face/ben_queen.mp4 -o /phd/face/ben_converted -m /phd/face/ben_queen_model
This will spit out a set of frames. We can combine these into a video with ffmpeg:
ffmpeg -i ben_test_%6d.png -c:v libx264 -vf "fps=25,format=yuv420p" out.mp4
At this point we have a video file but with no sound. We also have our bluescreen effect to finish. I tried a couple of video editing programs on Linux - flowblade and kdenlive. I settled on the latter as it has a plugin for chroma keying. At the time of writing this blog post, I've seen a paper that - perhaps somewhat ironically - uses deep learning to generate a green screen effect without the greenscreen! Seems like you can do anything with AI these days!
Kdenlive is pretty good for a free video editing tool. I was rather impressed! With the sound added and the background replaced, all that was left was to write up some credits, add a couple of out-takes and we were done!
This was a fun project! Dressing up in drag was quite amusing for me, as was trying to mimic the Queen's voice.
Soon after I sent this to my family in November, I was made aware of a Channel 4 program doing the same thing, in order to highlight the threats posed by deepfake technology. I suppose I was ahead of the curve, if only by a couple of months. Their version is clearly much more accurate and well produced, but I imagine the principles are the same.
There is a lot to worry about with deepfake technology but getting it right requires a lot of time and energy. At the moment, I'd say it's reasonably easy to spot a fake but this will likely get harder in the future. In a time where trust in the media, governments and institutions seems to be pretty low, this sort of thing might fan these flames, or it might mean we get a bit more critical with the media we consume. I hope for the latter.
