
I've started a PhD with the LIDo at King's College London, after I finished at Birkbeck. I was looking into the shape of antibody loops using machine learning (you can see the code for all that here on zenodo. I was playing around with Tensorflow for most of that. It gave me a good grounding for the current project which involves something totally different - microscopy images.
In a nutshell, we want to be able to take pictures of cells and proteins and do more with them. Since proteins and cells are quite small, we run into problems with the wavelength of light and the size of objects we can resolve. You can do a lot with electron microscopy but then you end up killing whatever you look at. Enter Super Resolution Microscopy!
Super resolution uses a number of tricks to get around the diffraction limit of light. A chap called Ernst Abbe came up with the Abbe limit which gives the minimum resolvable distance for a particular wavelength:
Where (NA) is the numerical aperture (something like 1.4 or 1.6). Ultimately, there is only so much you can resolve with light, and many of the things we want to look at are much smaller than this limit. So we need to do some tricks!
There are a whole load of techniques over at wikipedia but it seems to me that STORM and PALM are the ones in common use. The idea is you take many images over time and combine them in such a way as to create a more detailed image.
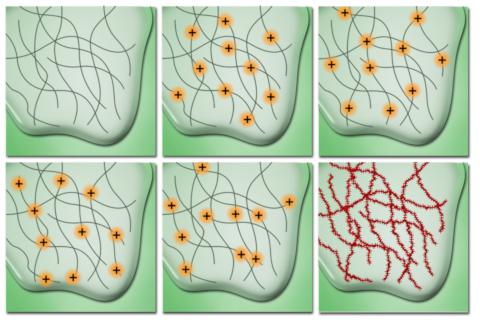
This is possible because of the way proteins are often imaged. If you are interested in one particular molecule it tends to be tagged with a small antibody or other chemical known as a fluorophore. They emit a particular wavelength of light when excited by another wavelength. However, when we have lots of them, they tend to illuminate randomly (or stochastically if we are being fancy!). They also tend to have a pattern to their light which can be modelled using something called the point spread function. With these things in mind we can begin to create an image.
Firstly, we can take a blurred image of a single point and using the point spread function, figure out where the actual point is. Imagine the reverse of taking a pixel, then blurring it out in all directions by, say 10 pixels or so. We can make a very good guess as to where the original point is and how big it is.
Secondly, as the fluorophores only illuminate randomly, the problem of occlusion is reduced. Imagine if you will, two fluorophores very close together that illuminate at the same time. They'd blur into one and we'd have trouble separating them. Of course, if one flashes before the other, we get a bit more information that helps us resolve each one.
The problem with this technique is we need to take many images, not just one. We need to be as fast as we can with the point spread function and any other computer vision processes we might be using. That's where the machine learning and engineering comes in.
Quite often, we use these images to understand what state a cell is in or what shape it has. If we can plot points on a particular molecule, we can get an idea of its structure which is very handy thing to know in biology.
For now, lets simplify things. If we know what kind of thing we are looking for, it'll make it easier to spot in image. One such simple protein is called CEP-152 and it looks like a torus. So lets assume for now, we are looking for torus-shaped things. If we assume we have an image of a torus-shaped protein, can we tell what orientation it is in?
Turns out we can!
PyTorch is the evolution of the original Torch library for heavy maths and machine learning. It's a little different from Tensorflow and I thought I'd change things up a bit. I quite like it and it's fairly easy to pickup.
The plan was to take an image, pass it through a convolutional network and creating another image, then comparing the two. This should result in an error that we can pass backward through the network to update the weights and hopefully learn something about the image.
We break the problem down into two parts. The first is the convolutional network that takes an image and produces 3 values x rotation, y rotation and z rotation. This part is fairly straight forward and several examples of this sort of thing can be found on the PyTorch website.
The second half of the problem is much tricker and requires us to take a set of points and the three rotations and create a 2D image. Where does one even start?
Thankfully, I remember all the things from my pxljs days and the rendering pipeline for 3D graphics is well documented. You take your 3D points (actually 4D as there x, y, z and w values), multiply them by about 4 different matrices and you'll end up with the 2D coordinate of the pixel in the image you need to turn on.
This set of matrix multiplications is differentiable and therefore fine to implement in PyTorch and use in a loss function. All sorted you might think? Well actually, no.
If you are a programmer like me, you'd take your nice 2D x,y pixel position and use these values as an index into your image. Something like take y, multiply it by the width of the image and add x, then you have an index. Set this to one and boom! Done. Well, this is not differentiable. Bugger!
But there is a way out! We can take our 2D vector (x,y) and split it into 2, 2 dimensional matrices the same size as our output image. The first matrix contains nothing but the x value, the second is populated with just the y value. What use is that you ask?
Well, if we subtract each matrix from a special index matrix and combine both of these, we get an offset matrix where the point we are interested in is set to 0 and all other points are set to the distance from this point. With this information we can create our final image. Index matrices, it turns out, are quite common in this sort problem space. Here is the code in Python:
  # Create our index matrix for x and y.
  numbers = list(range(0,size[0]))
  square = [ numbers for x in numbers]
  xs = torch.tensor(square, dtype = torch.float32)
  ys = xs.permute([1,0])

  # Now expand out our x and y value
  ex = px.expand(points.shape[0], xs.shape[0], xs.shape[1])
  ey = py.expand(points.shape[0], ys.shape[0], ys.shape[1])

  offset_x = xs - es
  offset_y = ys - ey
  final_matrix = torch.abs(offset_x) + torch.abs(offset_y)
In case that's not very clear, here is the kind of thing we are trying to do with a very small and simple, 3 x 3 image. Imagine we want to set pixel (1,2) to white:
 index x matrix  x matrix  final x matrix
 0 1 2         1 1 1      -1 0 1
 0 1 2    -    1 1 1   =  -1 0 1
 0 1 2         1 1 1      -1 0 1

 index y matrix  y matrix  final y matrix
 0 0 0         2 2 2       -2 -2 -2
 1 1 1    -    2 2 2   =   -1 -1 -1
 2 2 2         2 2 2        0  0  0

 abs final x      abs final y  final final
    -1 0 1        -2 -2 -2      3  2  3
abs -1 0 1  + abs -1 -1 -1  =   2  1  2
    -1 0 1         0  0  0     -1  0  1
So there you have it! A matrix with the point we want set to 0. We only need to set our index matrices once. It's reasonably easy to create the x and y matrices with the functions in PyTorch. I had a bit of help figuring this one out. I was bashing my head against a wall for a few days. Best advice? Don't do that. Ask your supervisors and fellow students for help.
We should probably start with some ground truth data before anything else. Lets make sure we've got everything working. We have a nice model of a torus and a function to create nice Gaussian blobs where the vertices are. Lets generate a load of images, then pass them into our network and see if it can recover the angles.
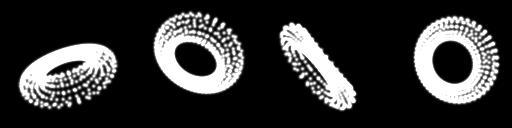
Lets start with the one on the far right. It has the angles 1, -67 and -77 degrees respectively. Lets see what we end up with?
Output rotations: 67.82590264705848 -22.634898569774585 -24.638662628844763
Doesn't look too good, but let's not be too hasty. What does the actual image look like?
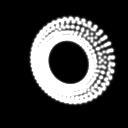
What is going on here? Well, a torus is quite symmetrical isn't it? Also, rotating by, say -180, is just the same as rotating 180, so there are many combinations that actually result in the same image. So in the end, the result isn't too bad.
Asymmetry is the next thing to test. That reduces the number of acceptable solutions. Our assumption that a particular protein is in the shape of a torus is very limiting and quite the assumption to make so we'll need to find a way around that eventually.
